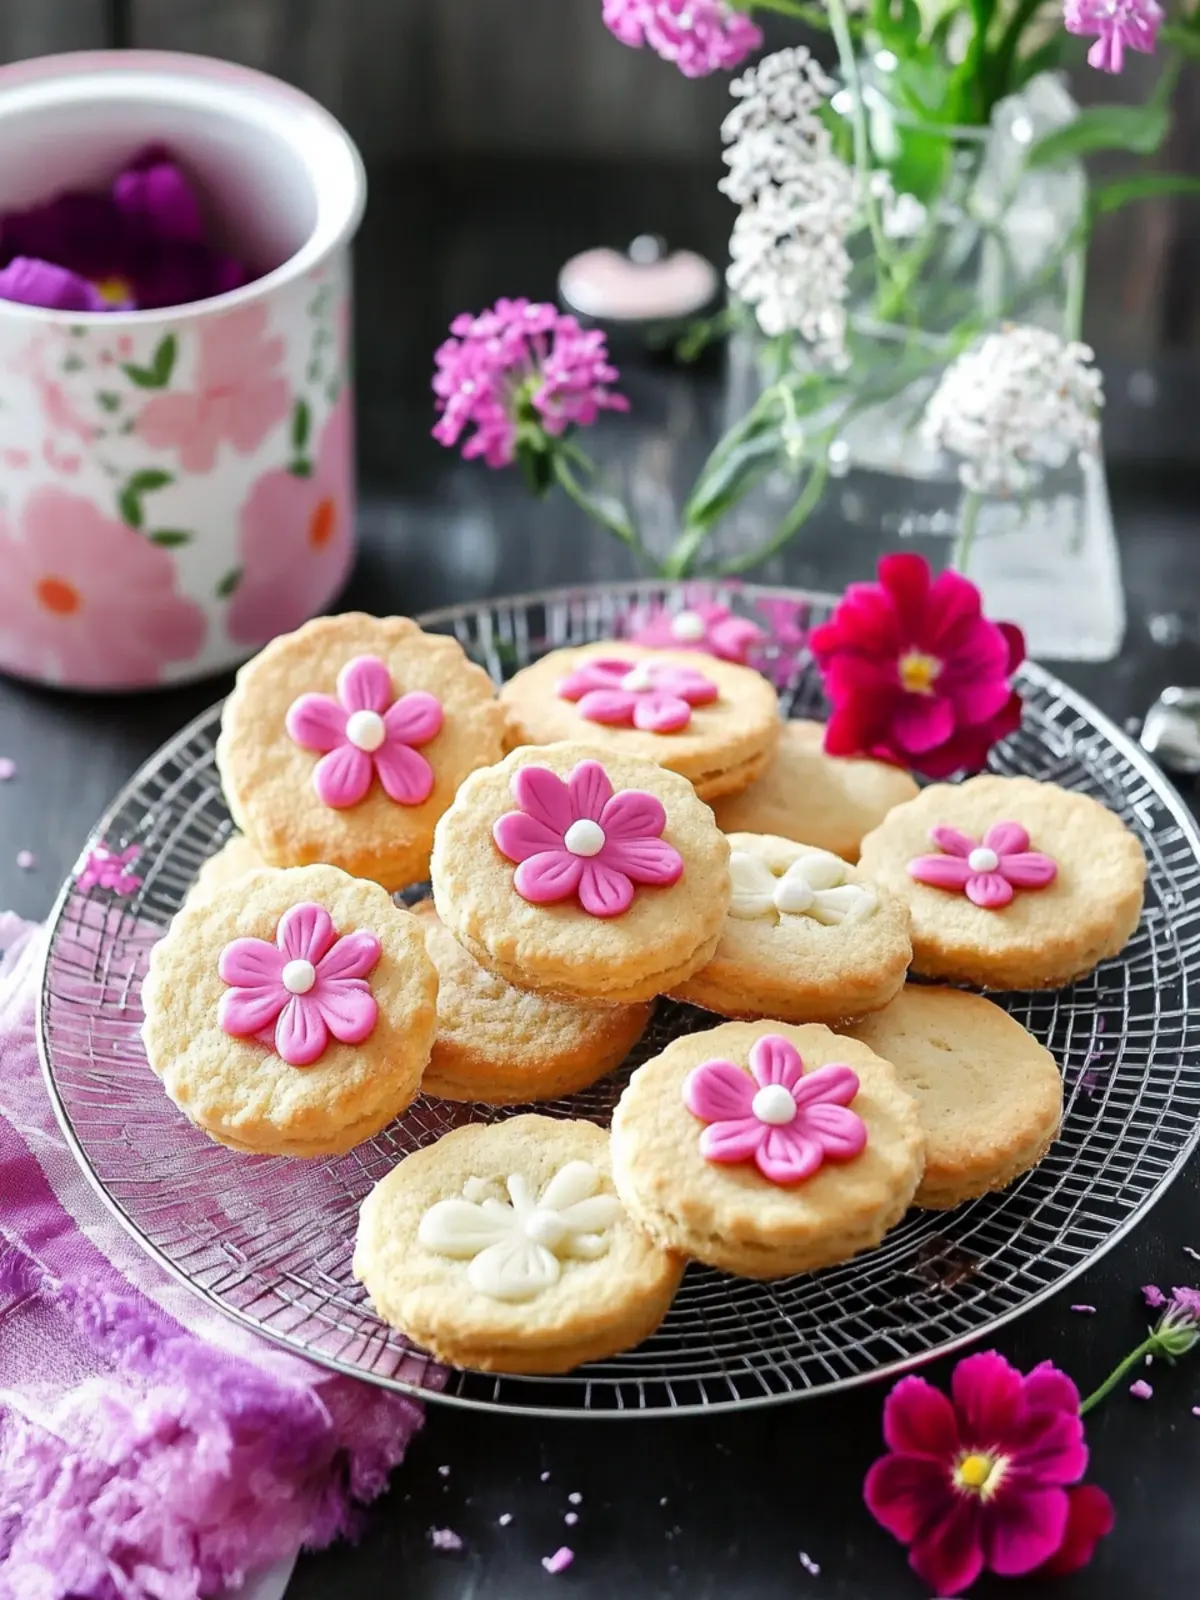
Every year, as Mother’s Day approaches, I find myself reminiscing about the tender moments spent with my mom in the kitchen. The warmth of her laughter blended with the sweet aroma of freshly baked cookies always fills me with joy. This year, I wanted to create something truly special: Flower Shaped Biscuits that capture the essence of love and care. These delightful treats not only look beautiful but are also incredibly simple to make, making them perfect for novice bakers and experienced chefs alike.
With just a handful of ingredients like buttery goodness, zesty lemon, and vibrant icing, you’re poised to create a delightful assortment that could brighten any Mother’s Day celebration. Whether you’re planning a surprise breakfast in bed or an afternoon tea gathering, these charming biscuits are sure to please. So, roll up your sleeves and let’s dive into this fun and rewarding baking adventure, where the heart meets the art of biscuit-making!

Why are these Mother’s Day Biscuits special?
Delightful, these flower-shaped biscuits bring a cheerful touch to your Mother’s Day table.
Easy to make, they allow everyone from novices to seasoned bakers to join the fun.
Flavorful zest of lemon pairs beautifully with the buttery dough, creating a delightful contrast.
Versatile decorations give you the freedom to unleash your creativity—perfect for personalizing.
Perfect gifts, they can be beautifully packaged for a heartfelt gesture to show appreciation.
Craft these biscuits and explore new flavor combinations for future celebrations!
Mother’s Day Biscuits Ingredients
For the Biscuits
• 250 g butter – ensures a rich, flaky texture that melts in your mouth.
• 200 g Tate & Lyle Golden Caster Sugar – adds a delightful sweetness perfect for these Mother’s Day biscuits.
• 1 egg yolk – helps bind the dough and enriches the flavor.
• 500 g plain flour – forms the base of your biscuits, providing the right structure.
• Zest of 1 lemon – infuses a refreshing citrus note that lifts the overall flavor.
• 3-4 tbsp milk – to achieve the perfect dough consistency, making it nice and soft.
For the Icing
• 250 g Tate & Lyle Royal Icing Sugar – gives your biscuits a smooth, sweet finish that’s perfect for decorating.
• Water (as needed for icing) – adjust the texture for piping or flooding; it’s essential for achieving the right consistency.
How to Make Mother’s Day Biscuits
Preheat your oven to 200°C/Fan180°, 400°F, Gas 6. This ensures a perfectly crisp outside while keeping the inside tender and melt-in-your-mouth delicious.
Grease two baking trays lightly. This step prevents sticking and allows your beautiful biscuits to come off easily once baked.
Cream the butter and Tate & Lyle Golden Caster Sugar together in a large bowl until light and fluffy. This should take about 3-4 minutes, and it’s crucial for getting that airy texture!
Sift in the plain flour, add the lemon zest, and gently mix until combined. Then, pour in the milk to create a fairly soft dough that holds together without being sticky.
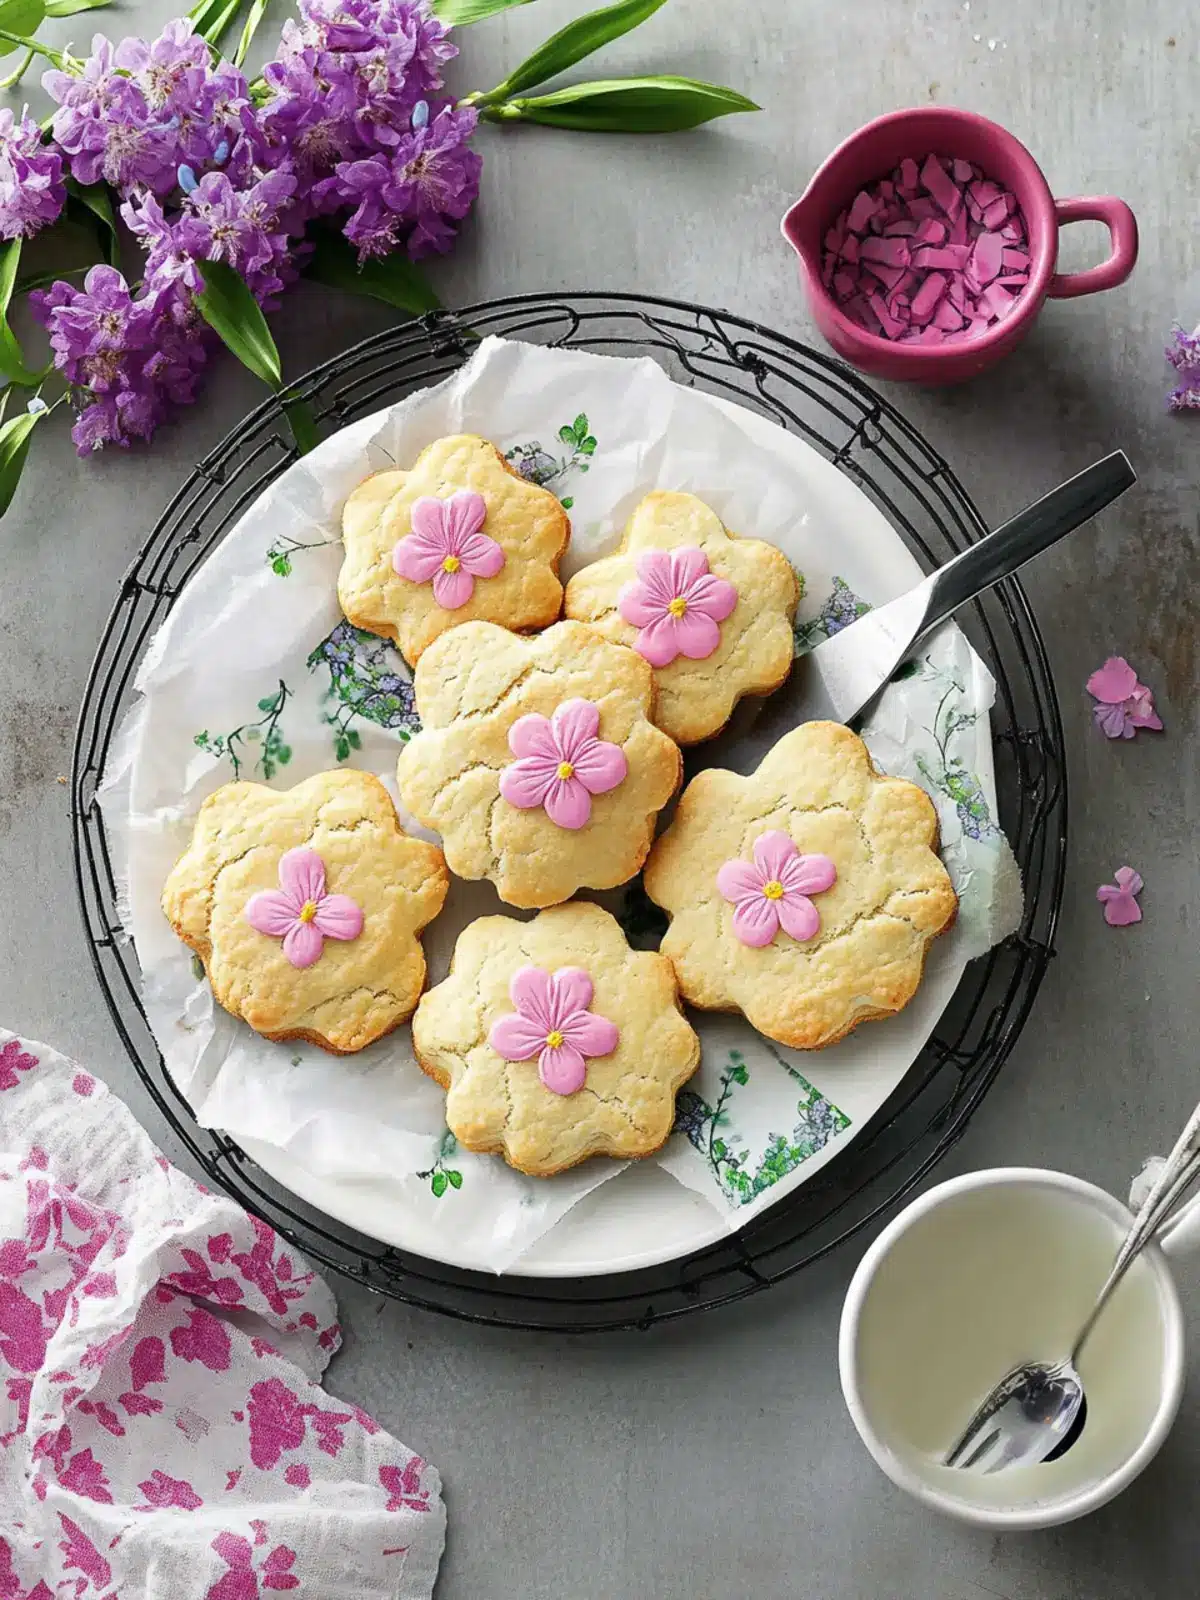
Knead the mixture on a lightly floured surface before rolling it out to about 5mm (¼”). Use your flower cutter to stamp out roughly 40 rounds and place them on the baking trays, spaced apart for even baking.
Bake for 7-9 minutes until golden, swapping the trays halfway through to ensure they bake evenly. Remove them to a wire rack to cool completely as you prepare the icing.
Make the icing by placing water in a bowl and sifting in the Tate & Lyle Royal Icing Sugar. Mix with a wooden spoon until you reach a thick, smooth consistency resembling toothpaste.
Divide the icing into three small bowls, using about one-third for piping. Color each bowl with your desired shades to personalize your biscuits in rainbow hues!
Adjust the flooding icing by adding a few drops of water at a time until it’s smooth and slightly thicker than double cream. This pourable icing will create a lovely finish.
Check the piping icing’s consistency by dragging a knife through it and counting to 10; it should smooth out in 5-10 seconds. If it does, you’re ready to pipe!
Snip a small piece off the tip of the piping bags and pipe an outline border about 1cm (½”) above the biscuit. Let them dry for 10 minutes to set.
Fill in the middle of each biscuit with flooding icing using a teaspoon and a zig-zag motion. Pop any air bubbles immediately with a toothpick for a smoother finish.
Dry the decorated biscuits in the oven at 140°C/Fan120°, 275°F, Gas 1 for about 15 minutes. This step helps firm up the icing for a clean look; cool them on a wire rack afterward.
Attach the flower biscuit to your card by piping a little icing on the back and placing it gently. Leave to dry flat for a few hours, ensuring a secure hold.
Optional: Add edible glitter for a sparkling finish!
Exact quantities are listed in the recipe card below.
Make Ahead Options
These Mother’s Day Biscuits are ideal for busy cooks looking to save time! You can prepare the biscuit dough up to 24 hours in advance; simply wrap it tightly in plastic wrap and refrigerate to keep it fresh. Alternatively, you can bake the biscuits ahead of time and store them in an airtight container for up to 3 days. For icing, prepare it in advance and store it in an airtight container as well, shaking or stirring it to restore the right consistency before use. When you’re ready to serve, simply decorate the biscuits as per the instructions and enjoy your delightful treats that are just as fresh and beautiful as if they were made that day!
What to Serve with Mother’s Day Biscuits?
Transform your delightful biscuits into a charming feast that celebrates love and flavor.
Fresh Berries: A medley of strawberries, blueberries, and raspberries adds a juicy sweetness that perfectly complements the rich biscuits. Their vibrant colors make the presentation pop!
Whipped Cream: Light and airy whipped cream brings a silky texture that contrasts beautifully with the crunchy biscuits. A dollop on the side enhances each delightful bite.
Flower Tea: A soothing cup of floral-infused tea creates a serene atmosphere while harmonizing with the biscuit’s inviting flavor—a perfect pairing for a Mother’s Day treat.
Lemonade: Serve a refreshing pitcher of homemade lemonade with a hint of mint to brighten the palate. Its citrus notes echo the lemon zest in the biscuits, creating a cohesive flavor experience.
Chocolate Drizzle: Adding a touch of elegance, a warm drizzle of chocolate over the biscuits introduces a rich, decadent layer that’s irresistible and elevates the sweet experience.
Fruit Platter: Include a variety of seasonal fruits like peaches and kiwi. Their bright flavors and textures offer a fresh contrast while celebrating the essence of springtime.
Sparkling Wine: For a celebratory touch, serve these biscuits with a glass of bubbly. The effervescence elevates the mood and pairs wonderfully with the sweetness of the biscuits—an ideal toast to a special occasion.
Each addition enhances the charm of your Mother’s Day biscuits, making the gathering truly memorable!
Tips for the Best Mother’s Day Biscuits
Room Temperature Ingredients: Make sure your butter is at room temperature; this helps achieve that light and fluffy texture in your dough.
Don’t Overmix: When combining the ingredients, mix just until incorporated. Overmixing can lead to tough biscuits, which we want to avoid!
Chill if Needed: If your dough feels too soft to handle, refrigerate it for about 30 minutes before rolling. A firmer dough makes cutting shapes much easier!
Measure Icing Carefully: For both piping and flooding icings, measuring your icing sugar accurately is vital—too much water will ruin the consistency.
Watch the Baking Time: Keep a close eye on your biscuits as they bake. Ovens can vary, and you want them just golden—not too brown!
Decorate Creatively: Feel free to experiment with different colors and patterns for your icing! The fun designs can make your Mother’s Day biscuits even more special.
Mother’s Day Biscuits Variations
Feel free to let your creativity bloom by customizing these biscuits to suit your taste!
Gluten-Free: Substitute plain flour with a 1:1 gluten-free baking blend for equally delightful results.
Dairy-Free: Replace the butter with a non-dairy alternative like coconut oil for a delightful dairy-free option.
For an extra touch, use flax milk in place of regular milk, adding a subtle nuttiness to the dough.
Zesty Twist: Incorporate lime or orange zest instead of lemon for an exciting citrusy variation.
Chocolate Lovers: Fold in some mini chocolate chips into the dough before cutting out your shapes for a sweet surprise.
Imagine biting into a flower-shaped biscuit with a rich chocolate burst.
Nutty Addition: Add finely chopped nuts like almonds or walnuts to the dough for added texture and flavor.
Spiced Biscotti: Incorporate a pinch of cinnamon or nutmeg into the mix for a warm, comforting spice.
The aromatic spices will take your biscuits to a cozy, comforting level.
- Sprinkle of Joy: Top your iced biscuits with colorful sprinkles or edible glitter for a festive flair.
These variations can elevate your biscuits from ordinary to extraordinary, making your Mother’s Day celebration unforgettable!
How to Store and Freeze Mother’s Day Biscuits
Room Temperature: Store cooled biscuits in an airtight container for up to 3 days to keep them fresh. Enjoy them with a cup of tea or coffee!
Fridge: If you want to extend their freshness, you can refrigerate the biscuits for up to 1 week. Just remember to keep them covered to prevent them from drying out.
Freezer: Freeze uniced biscuits for up to 3 months. Place them in a freezer-safe container; layer with parchment paper to avoid sticking.
Icing Storage: Store any leftover icing in an airtight container at room temperature for up to 2 days or refrigerate for up to 1 week. When ready to use, let it come to room temperature before applying.

Mother’s Day Biscuits Recipe FAQs
What type of butter should I use for the biscuits?
I recommend using unsalted butter for these Mother’s Day biscuits. It allows you to control the saltiness of the final product and enhances the rich flavor of the biscuits. Ensure your butter is at room temperature for easy creaming with sugar.
How should I store the biscuits after baking?
Store your cooled biscuits in an airtight container at room temperature for up to 3 days. If you’ve made a large batch and want to keep them fresh longer, you can refrigerate them for up to a week, just be sure to keep them covered to prevent drying out.
Can I freeze the Mother’s Day biscuits?
Absolutely! For best results, freeze uniced biscuits by placing them in a freezer-safe container layered with parchment paper to prevent sticking. They can be kept for up to 3 months. When you’re ready to enjoy them, simply thaw them at room temperature.
What if my icing is too runny for piping?
If your icing for piping is too runny, don’t worry! Simply add a little more sifted icing sugar to thicken it up. Mix gently until you reach the desired consistency—remember, it should hold its shape when piped. If it’s too thick, add a few drops of water gradually, mixing well between each addition.
Are these biscuits suitable for people with allergies?
These Mother’s Day biscuits are not gluten-free or dairy-free since they contain flour and butter. If you have specific dietary restrictions or allergies, consider substituting with gluten-free flour and a dairy-free butter alternative. Always double-check your ingredient labels to ensure they meet your specific needs.
How do I decorate the biscuits creatively?
Unleash your creativity! You can use a variety of colors in your icing, try different piping techniques, or even add edible glitter for sparkle. For unique designs, consider using stencils or simply freehanding patterns. The more the merrier, so let your imagination run wild!
Delightful Mother's Day Biscuits That Bloom with Flavor
Ingredients
Equipment
Method
- Preheat your oven to 200°C/Fan180°, 400°F, Gas 6.
- Grease two baking trays lightly.
- Cream the butter and Tate & Lyle Golden Caster Sugar together until light and fluffy.
- Sift in the plain flour, add the lemon zest, and mix until combined.
- Knead the mixture on a lightly floured surface before rolling it out to about 5mm (¼”).
- Use your flower cutter to stamp out roughly 40 rounds and place them on the baking trays.
- Bake for 7-9 minutes until golden.
- Remove them to a wire rack to cool completely.
- Make the icing by placing water in a bowl and sifting in the Tate & Lyle Royal Icing Sugar.
- Mix until you reach a thick, smooth consistency.
- Divide the icing into three small bowls and color each bowl with your desired shades.
- Adjust the flooding icing by adding a few drops of water until smooth.
- Check the piping icing’s consistency.
- Snip a small piece off the tip of the piping bags and pipe an outline border.
- Fill in the middle of each biscuit with flooding icing.
- Dry the decorated biscuits in the oven for about 15 minutes.
- Attach the flower biscuit to your card and leave to dry flat.