Looking for a rich, creamy, and indulgent dessert that requires zero baking? This No-Bake Oreo Mud Pie is the perfect treat! With layers of chocolate pudding, fluffy Cool Whip, and crunchy Oreo cookies, it’s an easy-to-make dessert that’s always a crowd-pleaser. Whether you’re hosting a party or just craving a sweet treat, this Oreo Mud Pie is sure to satisfy. Plus, it only takes a few simple ingredients and minimal effort!
Keep reading to discover how to make this delicious, no-bake dessert!
Ingredients for No-Bake Oreo Mud Pie 🍪🍫
Here’s what you’ll need to make this creamy, chocolatey delight:

Main Ingredients
- 16 oz Cool Whip – Provides a light and airy texture. You can substitute with homemade whipped cream.
- 3 cups milk – Used to mix with the pudding. Whole, skim, or non-dairy alternatives work too.
- 1 large box (6 oz) instant chocolate pudding mix – The key to a rich chocolate flavor. You can also try vanilla or caramel pudding for a twist.
- 18 oz package of Oreo cookies – Adds the perfect crunch. Feel free to use gluten-free or flavored Oreos for variety.
Optional Add-Ins & Variations
- Minty Twist: Add a few drops of mint extract and use Mint Oreos.
- Peanut Butter Lovers: Mix in ½ cup of creamy peanut butter with the Cool Whip.
- Fruity Variation: Add sliced bananas or strawberries between layers for extra flavor.
Step-by-Step Instructions for No-Bake Oreo Mud Pie 🍰
Step1: Prepare the Pudding Mixture
- In a large mixing bowl, whisk together the milk and instant chocolate pudding mix until it thickens.
- Let it sit for a few minutes to fully set.
Step2: Fold in the Cool Whip
- Gently stir in the Cool Whip until the mixture is smooth and fully combined.
Step3: Crush the Oreos
- Place 12 Oreo cookies in a zip-top bag and crush them using a rolling pin.
- Fold the crushed Oreos into the pudding mixture for added crunch.
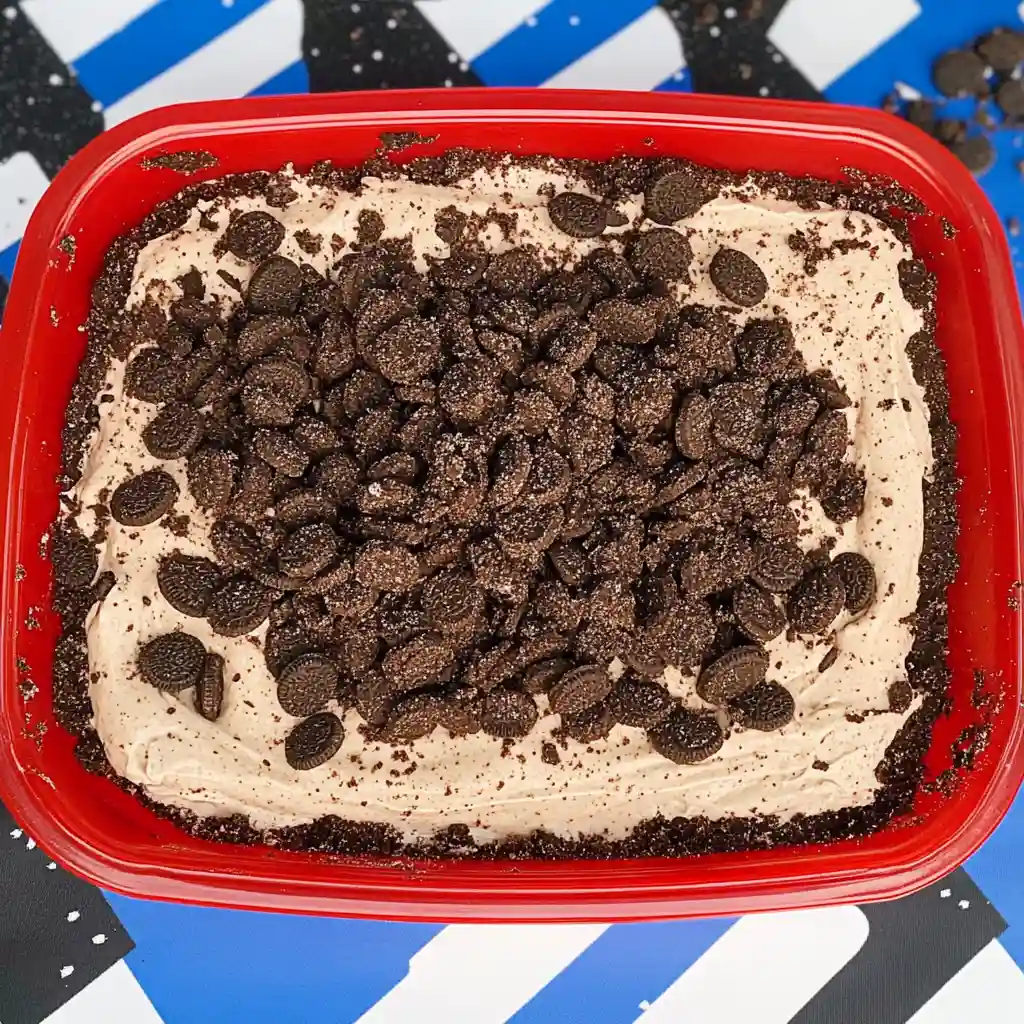
Step4: Assemble the Pie
- Spread the pudding mixture evenly into a 9×13-inch pan.
Step5: Add the Topping
- Crush 12 or more additional Oreos and sprinkle them on top of the pie as a garnish.
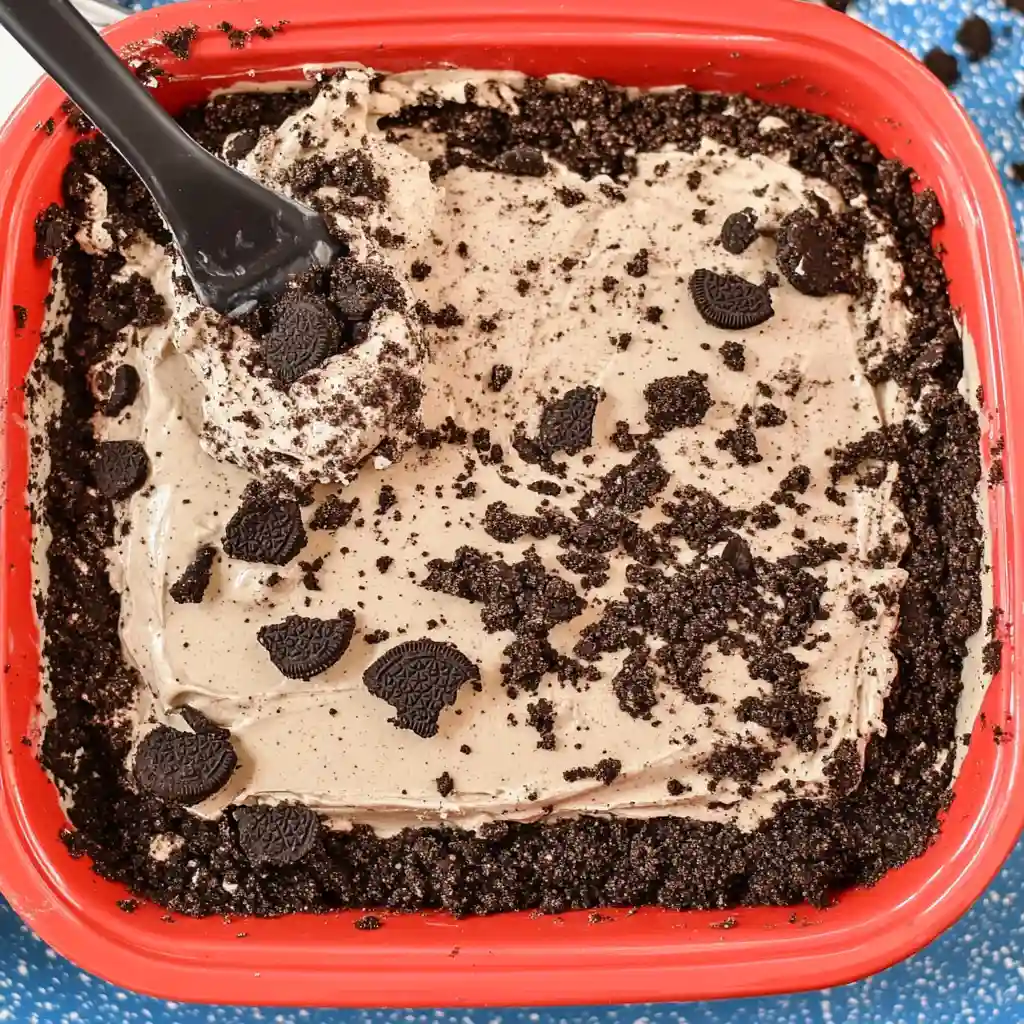
Step 6: Chill & Serve
- Refrigerate for at least 2 hours before serving to allow the flavors to meld together.
- Serve chilled and enjoy!
Pro Tips & Serving Suggestions 🍽️
Pro Tips for the Best No-Bake Oreo Mud Pie
- Use fully thawed Cool Whip – This prevents lumps and ensures a smooth, creamy texture.
- For extra decadence, drizzle chocolate syrup over the top before chilling.
- Want a crunchier texture? Save some whole Oreo chunks instead of crushing them completely.
- For a firmer pie, let it chill overnight to enhance the flavors and consistency.
Serving Recommendations
🍨 Top with whipped cream and an extra sprinkle of crushed Oreos for added flair.
🍓 Pair with fresh fruit, like sliced strawberries or bananas, to balance the richness.
☕ Serve with coffee or milk for the ultimate dessert experience.
Creative Recipe Variations
🌿 Mint Chocolate Mud Pie – Add ½ teaspoon of mint extract to the pudding and use Mint Oreos.
🥜 Peanut Butter Oreo Pie – Swirl ½ cup of creamy peanut butter into the Cool Whip before mixing.
🍌 Banana Oreo Delight – Add a layer of sliced bananas before spreading the pudding mixture.
Storage & Reheating Tips for No-Bake Oreo Mud Pie
🧊 Refrigerator: Store in an airtight container for up to 3 days. The flavors meld beautifully over time!
❄️ Freezer Option: Freeze for a firmer, ice-cream-like texture. Let it sit at room temp for 10–15 minutes before serving.
🔥 Reheating: This dessert is meant to be served cold—no reheating needed!
Nutrition Information (Per Serving – Approx. 89g)
- Calories: 291 kcal
- Carbohydrates: 43g
- Protein: 5g
- Fat: 12g
- Saturated Fat: 5g
- Sugar: 26g
No-Bake Oreo Mud Pie Recipe
Ingredients
Equipment
Method
- Step 1: Prepare the Pudding Mixture
- In a large mixing bowl, whisk together milk and instant chocolate pudding mix until thickened. Let it set for a few minutes.
- Step 2: Fold in the Cool Whip
- Gently stir in the Cool Whip until the mixture is smooth and creamy.
- Step 3: Crush the Oreos
- Place 12 Oreo cookies in a zip-top bag and crush them with a rolling pin.
- Fold the crushed Oreos into the pudding mixture.
- Step 4: Assemble the Pie
- Spread the pudding mixture evenly into a 9×13-inch pan.
- Step 5: Add the Topping
- Crush 12 more Oreos and sprinkle them on top as a garnish.
- Step 6: Chill & Serve
- Refrigerate for at least 2 hours before serving.
- Serve chilled and enjoy!
Notes
Freezing Option: Freeze for a firmer, ice-cream-like texture. Let sit at room temp for 10–15 minutes before serving.
Make-Ahead Tip: Preparing it a day in advance enhances flavor and texture!
FAQs for No-Bake Oreo Mud Pie 🧐
Here are some of the most common questions about making this No-Bake Oreo Mud Pie—along with helpful answers to ensure your dessert turns out perfect every time!
1. Can I use homemade pudding instead of instant?
Absolutely! If you prefer a from-scratch approach, you can make your own chocolate pudding instead of using the instant mix. Just be sure to let the pudding cool completely before mixing it with the Cool Whip. Otherwise, the warmth might cause the whipped topping to melt, altering the texture of your pie.
2. How do I make this recipe gluten-free?
If you need a gluten-free version, don’t worry—it’s easy to adjust! Simply swap out the regular Oreos for gluten-free chocolate sandwich cookies, which are widely available in most grocery stores. Additionally, check the packaging of your instant pudding mix to make sure it does not contain any gluten-based additives.
3. Can I make this dairy-free?
Yes! Making this No-Bake Oreo Mud Pie dairy-free is simple with a few substitutions. First, use a plant-based milk such as almond, soy, or oat milk instead of regular dairy milk. Second, replace the Cool Whip with a dairy-free whipped topping like CocoWhip. Finally, double-check that your pudding mix is dairy-free, as some brands contain milk-derived ingredients.
4. How can I crush Oreos without a rolling pin?
If you don’t have a rolling pin on hand, don’t worry—there are plenty of other ways to crush your Oreos! Here are a few methods:
- Food processor – Pulse the Oreos a few times until they reach your desired consistency.
- Heavy-bottomed glass – Place the cookies in a zip-top bag and press down with the base of a sturdy glass.
- Meat tenderizer or potato masher – These kitchen tools work well to break the cookies into smaller pieces.
- Hands-on approach – If you don’t mind getting messy, you can crush the Oreos by placing them in a bag and squeezing them with your hands.
5. Can I prepare this dessert ahead of time?
Yes, and in fact, it’s recommended! This Oreo Mud Pie actually tastes better when made in advance, as it allows the flavors to meld together beautifully. If you plan to make it ahead, simply cover the dish tightly with plastic wrap and store it in the refrigerator. It will stay fresh for up to 3 days.
6. How long does this Oreo Mud Pie last in the fridge?
When stored in an airtight container or covered tightly with plastic wrap, this dessert will stay fresh for about 3 days in the refrigerator. However, since it’s so delicious, it rarely lasts that long!
7. Can I freeze No-Bake Oreo Mud Pie for later?
Yes, you can freeze it for a firmer, ice-cream-like texture. To do this, simply cover it well with plastic wrap and aluminum foil before placing it in the freezer. When you’re ready to serve, let it thaw for 10-15 minutes at room temperature so it softens slightly before slicing.
8. What’s the best way to serve this dessert?
For the best texture and flavor, serve this Oreo Mud Pie chilled straight from the fridge. If you want to take it up a notch, try these serving ideas:
- Drizzle with chocolate or caramel syrup for extra indulgence.
- Top with extra crushed Oreos for more crunch.
- Add a dollop of whipped cream for an elegant touch.
- Pair with fresh fruit like strawberries or bananas to balance the richness.
9. Can I use different flavors of Oreos?
Absolutely! Feel free to experiment with different Oreo flavors to create a unique twist on this classic dessert. Here are some fun ideas:
- Golden Oreos – For a vanilla-flavored version.
- Mint Oreos – Adds a refreshing minty taste.
- Peanut Butter Oreos – Pairs beautifully with the chocolate pudding.
- Birthday Cake Oreos – Creates a fun, festive flavor.
10. How can I make my No-Bake Oreo Mud Pie extra special?
If you want to take your dessert to the next level, here are a few creative ways to enhance your No-Bake Oreo Mud Pie:
- Layer in sliced bananas or strawberries for a fruity surprise.
- Swirl in a spoonful of peanut butter or Nutella for extra richness.
- Sprinkle mini chocolate chips or crushed candy bars on top for more texture.
- Use a chocolate graham cracker crust instead of an Oreo base for a subtle twist.
Final Thoughts for No-Bake Oreo Mud Pie🎉
This No-Bake Oreo Mud Pie is the perfect easy dessert for any occasion! With its rich chocolate flavor, creamy texture, and crunchy Oreo topping, it’s a guaranteed crowd-pleaser. Whether you’re making it for a party, family gathering, or just a sweet craving, this dessert is simple, delicious, and totally irresistible.
💬 Tried this recipe? We’d love to hear from you! Leave a comment below and let us know how it turned out. Did you add any fun variations? Snap a picture and share it with us!
📌 Save this recipe for later! Bookmark this page or pin it on Pinterest so you always have it on hand.
🍽️ Looking for more no-bake desserts? Try these:
✅ No-Bake Reese’s Peanut Butter Pie 🥜
✅ No-Bake Hawaiian Dream Cups 🍍
Enjoy your Oreo Mud Pie! Happy baking (or no-baking)! 😊🍪
Love delicious inspiration? Follow me on Pinterest (opens in a new tab) for quick dinners, baking ideas, and meal-prep tips!
More Posts