The moment you sink your teeth into a perfectly baked pizza crust, it feels like a warm hug on a plate. Picture the golden brown edges, crisp yet chewy, ready to cradle your favorite toppings. Whether you’re channeling your inner chef or simply seeking a delicious dinner idea, making homemade pizza has never been more inviting. I discovered this flexible pizza crust recipe on a cozy evening when the craving for something comforting struck. With the ease of whipping it up in advance, it seamlessly fits into even the busiest of schedules, making it ideal for spontaneous get-togethers or family nights at home. And the best part? You can customize it to cater to everyone’s whims—from classic margherita to adventurous barbecue chicken. Let’s dive into this delightful experience of crafting your very own pizza crust that’s sure to impress!

Why will you love this pizza crust?
Ultimate enjoyment: There’s nothing quite like the satisfaction of creating your own pizza crust from scratch—fresh, warm, and tantalizing!
Versatile options: With variations for thin or thick crust and gluten-free alternatives, this recipe caters to every preference.
Time-saving and convenient: Prepare the dough ahead of time, perfect for last-minute cravings or busy weeknights.
Flavorful foundation: Infuse the crust with herbs or spices for an elevated taste that goes beyond traditional recipes.
Crowd-pleaser appeal: Everyone loves pizza, and with your homemade crust, you’re guaranteed to impress family and friends at any gathering.
Pizza Crust Ingredients
• Make your homemade pizza a reality with these essential components!
For the Dough
- Active Dry Yeast or Instant Yeast – Provides leavening for a light, airy crust; instant yeast can be used directly, while active dry yeast needs dissolving in water first.
- Lukewarm Water – Activates the yeast and hydrates the flour, which is essential for perfect dough development; adjust the amount based on your local humidity.
- Olive Oil – Adds moisture and flavor while improving the crust’s texture; you may substitute this with vegetable oil for a neutral taste.
- King Arthur Unbleached All-Purpose Flour – The key ingredient for structure in the crust; gluten-free flour can be used for those needing a gluten-free pizza crust option.
- Table Salt – Enhances flavor and is a must-have for yeast dough; don’t skip it for the best results!
Feel free to explore variations, enhance with herbs or spices, and make this pizza crust your own!
How to Make Pizza Crust
Activate Yeast: If you’re using active dry yeast, dissolve it in 2 tablespoons of lukewarm water and let it sit until bubbly, about 15 minutes. If you’re using instant yeast, you can skip this step!
Combine Ingredients: In a mixing bowl, combine the activated yeast (if applicable) with the remaining ingredients: lukewarm water, olive oil, flour, and salt. Stir until you form a shaggy dough.
Knead the Dough: Knead the dough by hand or with a mixer until a soft, smooth texture forms, approximately 4 to 5 minutes. Your dough should feel slightly elastic but not overly sticky.
First Rise: Place the dough in a greased bowl, cover it, and let it rise in a warm spot until it’s puffy, about 1 hour for instant yeast or 90 minutes for active dry yeast.
Refrigerate for Later: If you want to save the dough, let it rise at room temperature for 45 minutes, then refrigerate it for anywhere between 4 to 24 hours, allowing flavors to develop.
Shape the Dough: When ready to bake, decide on the thickness and shape you prefer for your pizza. Lightly grease a baking pan to prevent sticking.
Second Rise: Cover the shaped dough and let it rise for about 90 minutes until it looks puffy and fluffy, giving it that perfect airy structure.
Preheat Oven: Preheat your oven to 450°F. This ensures the crust cooks evenly and gets that lovely golden finish.
Bake: Place the crust in the oven and bake until it’s set and starting to brown at the edges—this should take about 8 to 14 minutes, depending on how thick you shaped it.
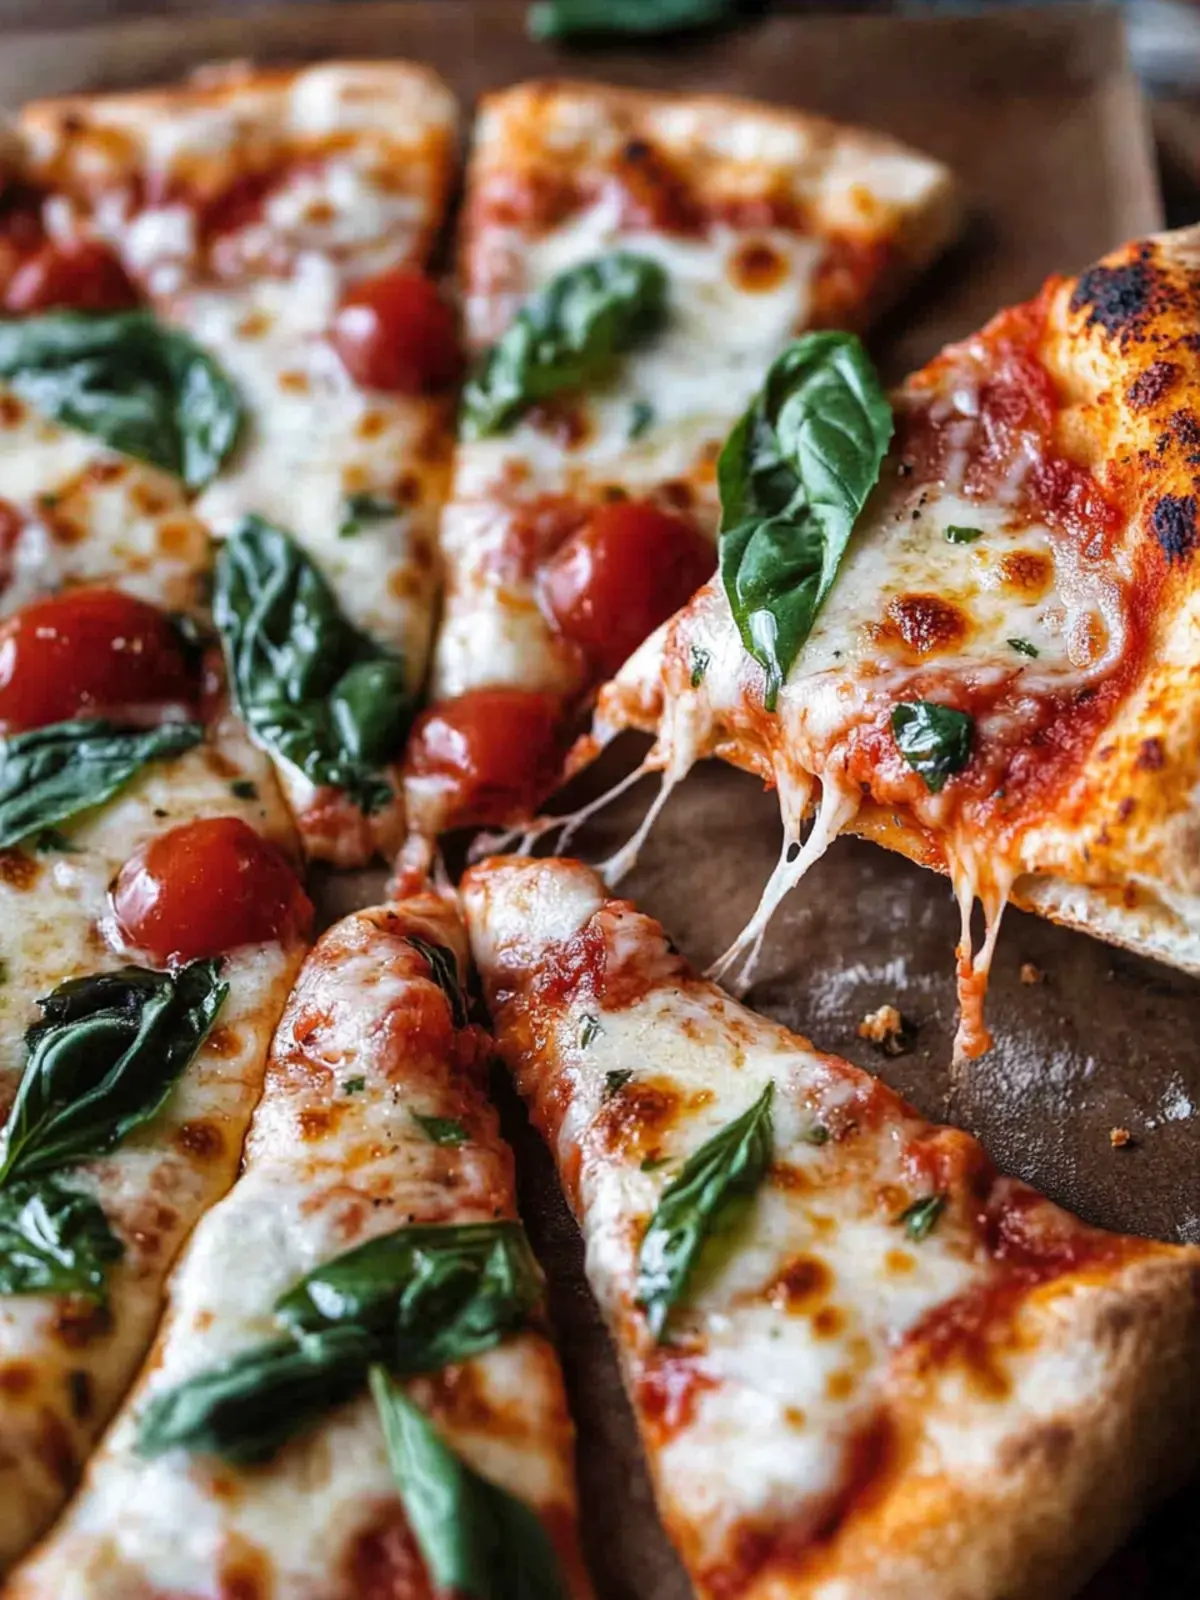
Top and Serve: Remove the crust from the oven and add your favorite sauces and toppings. Return it to the oven until the cheese is melted and beautifully browned.
Optional: Drizzle with a bit of olive oil after baking for an extra layer of flavor!
Exact quantities are listed in the recipe card below.

What to Serve with Homemade Pizza Crust?
Elevate your pizza night with delightful sides and drinks that perfectly complement your homemade creation.
Fresh Garden Salad: A crisp salad adds a fresh contrast to the hearty pizza, enhancing the meal with crunchy textures and vibrant colors. Toss in cucumbers, tomatoes, and a zesty vinaigrette for a refreshing palate cleanser.
Garlic Bread Sticks: Soft and buttery, these savory bites provide a satisfying sidekick to your pizza. The pleasant aroma of garlic mingling with warm bread is sure to delight everyone at your table.
Roasted Vegetables: Caramelized seasonal vegetables, like bell peppers and zucchini, bring depth and sweetness. Their roasted goodness makes a colorful, nutritious complement to your pizza feast.
Homemade Marinara Sauce: Serve a side of this rich and tangy sauce for dipping or drizzling. It’s a classic pairing that can enhance the overall flavor profile of your pizza experience.
Antipasto Platter: This cheerful assortment of cured meats, cheeses, olives, and marinated vegetables offers a delightful mix of flavors and textures. It’s the perfect appetizer to share while the pizza bakes away!
Craft Beer or Wine: Whether you prefer a crisp lager or a bold red wine, the right beverage will elevate your meal. They work harmoniously with the cheesy goodness, balancing flavors with every sip.
Dessert Pizza: For a sweet finish, consider a dessert pizza topped with Nutella, berries, and a sprinkle of powdered sugar. It’s a playful twist that delights both kids and adults alike!
Pesto Dip: A vibrant pesto dip pairs wonderfully with crust remnants and it adds an herby, nutty flavor that enhances the meal. This option is a creative way to use up leftover crust.
These options will turn your pizza night into a flavorful celebration!
Pizza Crust Variations
Customize your homemade pizza crust to fit your tastes and dietary needs, creating a unique experience for everyone at the table.
- Gluten-Free: Swap all-purpose flour for a gluten-free blend. Ensure the blend includes xantham gum for structure.
- Whole Wheat: Use whole wheat flour for a nuttier flavor and healthier option. It adds a delightful earthiness to your crust!
- Herb-Infused: Mix dried herbs like oregano or basil directly into the dough. This simple addition gives a fragrant twist to every bite.
- Cornmeal Crunch: Incorporate a tablespoon of cornmeal for a delightful texture that adds a slight crunch to your crust’s surface.
- Spicy Kick: Add a pinch of red pepper flakes to the dough for a zesty flavor and warm, inviting heat. Every slice becomes an exciting adventure!
- Cheesy Surprise: Fold shredded cheese, like mozzarella or parmesan, directly into the dough. It results in a rich, cheesy crust that’s irresistibly good.
- Sweet Twist: For dessert pizzas, blend in a tablespoon of sugar and some cinnamon. This heavenly combination is perfect for drizzling with chocolate or fruit toppings.
- Alternative Oils: Experiment with flavored oils like garlic-infused olive oil instead of regular olive oil for an aromatic touch that elevates your crust’s profile.
Expert Tips for Perfect Pizza Crust
Don’t Over-knead: Keep the dough slightly rough for the best texture; over-kneading can result in a dense crust.
Adjust Water for Humidity: If you’re in a humid area, use a bit less lukewarm water. Too much can lead to a sticky dough that’s hard to manage.
Preheat Your Baking Stone: If you’re using a baking stone, let it heat for at least 45–60 minutes to ensure a crispy pizza crust.
Use Quality Flour: Opt for King Arthur Unbleached All-Purpose Flour. The right flour makes a difference in the dough’s elasticity and taste.
Flavor Boost: Mix in dried herbs like oregano or garlic powder directly into the dough for an extra pop of flavor in your pizza crust.
Quick Storage Tips: If not using the dough immediately, wrap it tightly and store in the refrigerator for up to 24 hours to enhance its flavor.
Make Ahead Options
These pizza crusts are perfect for meal prep enthusiasts, making your busy weeknights a breeze! You can prepare the dough up to 24 hours in advance; just let it rise for about 45 minutes at room temperature before refrigerating. When you’re ready to bake, take the chilled dough out and shape it directly, allowing for a 90-minute second rise until puffy. To maintain quality, ensure the dough is tightly wrapped while in the fridge to prevent drying out. Just follow the baking instructions as noted, and you’ll have a delicious pizza crust that’s just as satisfying as a fresh batch. Enjoy all the culinary creativity with minimal effort!
Storage Tips for Pizza Crust
Room Temperature: Store baked pizza crust at room temperature wrapped tightly in plastic wrap for up to 2 days to maintain its freshness.
Fridge: If you have leftover dough, refrigerate it for up to 24 hours, allowing flavors to develop. Wrap it tightly to prevent drying out.
Freezer: For longer storage, freeze baked pizza crust by wrapping it securely in aluminum foil or plastic wrap. It can last up to 3 months.
Reheating: To enjoy your frozen pizza crust, thaw it in the fridge overnight, then bake at 450°F for about 5-7 minutes for a crispy finish.

Pizza Crust Recipe FAQs
How do I choose the right yeast for the pizza crust?
Choosing the right yeast is crucial for a successful pizza crust! You can use either active dry yeast or instant yeast. If you opt for active dry yeast, dissolve it in lukewarm water for about 15 minutes until bubbly. Instant yeast doesn’t require activation and can be mixed directly with your dry ingredients. Both will yield fantastic results, so it depends on your preference and what you have on hand.
What’s the best way to store pizza crust?
Storing your pizza crust properly can keep it fresh for longer! If you have baked pizza crust left, wrap it tightly in plastic wrap and store it at room temperature for up to 2 days. For longer storage, you can refrigerate the baked crust, but keep it wrapped to prevent drying out. If you want to stash it away for an extended period, freeze the crust in aluminum foil or plastic wrap; it will keep well for up to 3 months.
Can I freeze raw pizza dough?
Absolutely! Freezing raw pizza dough is a great option for busy days. After the first rise, shape the dough into your desired form, wrap it tightly in plastic wrap or an airtight container, and freeze it. When you’re ready to use it, thaw the dough in the refrigerator overnight, then allow it to rest and rise at room temperature for about 30 minutes before shaping and baking.
What should I do if my pizza crust is too sticky?
No worries, this can easily be fixed! If your dough is sticky during kneading, sprinkle a little more flour gradually until it reaches a soft yet workable consistency. Be careful not to add too much flour too quickly; aim for just enough to make the dough pliable. It’s all about finding that right balance for a delicious pizza crust!
Can I make this pizza crust gluten-free?
Yes, you can! To make a gluten-free pizza crust, substitute the all-purpose flour with a high-quality gluten-free flour blend that’s designed for baking. Make sure to look for one that contains xanthan gum, as it helps provide structure and chewiness closely resembling traditional pizza crust. Follow the same instructions and enjoy your gluten-free pizza!
How do I know when my pizza crust is perfectly baked?
Perfectly baked pizza crust should be golden brown and have a slightly crispy exterior with a soft inside. When you gently tap the bottom, it should sound hollow. Depending on your oven and the thickness of your crust, baking time will vary, so keep an eye on it! Typically, for a standard thickness, you’re looking at about 8 to 14 minutes in a preheated oven at 450°F.
Ultimate Pizza Crust Recipe for Delicious Homemade Pizzas
Ingredients
Equipment
Method
- If using active dry yeast, dissolve it in lukewarm water and let it sit until bubbly, about 15 minutes.
- Combine the activated yeast (if applicable) with lukewarm water, olive oil, flour, and salt in a mixing bowl. Stir until a shaggy dough forms.
- Knead the dough by hand or with a mixer until soft and smooth, about 4 to 5 minutes.
- Place the dough in a greased bowl, cover, and let it rise in a warm spot until puffy, about 1 hour for instant yeast or 90 minutes for active dry yeast.
- For storage, let it rise at room temperature for 45 minutes, then refrigerate for 4 to 24 hours.
- When ready, lightly grease a baking pan and shape the dough.
- Cover the shaped dough and let it rise for about 90 minutes.
- Preheat the oven to 450°F to ensure even cooking.
- Bake the crust until set and starting to brown at the edges, about 8 to 14 minutes.
- Remove from oven, add toppings, and return until cheese is melted.